Wednesday 15 August 2012

Kansai-Style Japanese Cabbage Pancake (Kansaikaze Okonomiyaki) 関西風お好み焼き - Vegetarian


Bit Bit made okonomiyaki for dinner, and so as usual, Bit Bit needs to make a vegetarian one for Pig too.

This dish took about an hour to finish.

Things that Bit Bit found out about making Vegetarian Kansai-Style Okonomiyaki:
  • One can add anything that one likes in okonomiyaki, so just choose one's favourite ingredients and it will turn out very yummy.
  • While cooking the okonomiyaki, turn heat to low to prevent the bottom of the okonomiyaki from getting burnt and also to cook the insides thoroughly.
  • Other than okonomiyaki sauce, one can also use other condiments that one likes, for example, Bit Bit likes it with ketchup, or one can use light soy sauce if one prefers a more savoury flavour.
  • Okonomiyaki is a pancake made with mainly cabbage, and is crispy outside and soft in the inside. Bit Bit likes it a lot!
Ingredients that Bit Bit used to make Vegetarian Kansai-Style Okonomiyaki:
  1. All Purpose Flour - About 50gm
  2. Baking Powder - 1/4 Tsp
  3. Water - About 80ml
  4. Granulated Dashi - 1/8 Tsp
  5. Salt - A Pinch
  6. Cabbage - About 150gm to 200gm
  7. Beansprouts - 1/2 Cup
  8. Cheese - 1 Slice
  9. Ketchup - 3 Tbsp
  10. Vegetarian Oyster Sauce - 2 Tbsp
  11. Honey - 1.5 Tbsp
  12. Canola Oil - 1/2 Tbsp
Method that Bit Bit used to cook Vegetarian Kansai-Style Okonomiyaki:
  1. In a big bowl, add in flour, baking powder and salt.
  2. In a small bowl, add in water and granulated dashi, and mix well.
  3. Pour the dashi mixture into the big bowl, and mix well.
  4. Wash the cabbage, shred into small pieces and add into the flour mixture.
  5. Wash the beansprouts and add into the flour mixture.
  6. Tear the cheese slices into small pieces and add into the flour mixture.
  7. Mix the ingredients with the flour mixture well.
  8. Heat up a pan and grease the pan.
  9. Turn heat to low and pour in the okonomiyaki mixture, forming a round circle.
  10. Let the okonomiyaki cook for about 10 minutes, or till the bottom browns.
  11. Flip the okonomiyaki over and let the other side of the okonomiyaki cook for about 10 minutes, or till it browns.
  12. Use a spoon or spatula to press the okonomiyaki lightly, flattening it a little.
  13. Cook for about 3 to 5 minutes and flip it over.
  14. In a small bowl, mix the ketchup, honey and vegetarian oyster sauce.
  15. Spread the sauce mixture on the top of the okonomiyaki, while still letting the okonomiyaki cook.
  16. Cook for about 2 to 3 minutes more.
  17. Serve and eat!

Monday 13 August 2012

Kansai-Style Japanese Cabbage Pancake (Kansaikaze Okonomiyaki) 関西風お好み焼き


There is a big head of cabbage in the fridge and Bit Bit was thinking of making either stir-fried cabbage or cabbage soup, which are easier to cook. However, Bit Bit wants to try something Japanese, and so okonomiyaki sounds like a good idea to use up the cabbage.

This dish took about an hour to finish.

Things that Bit Bit found out about making Kansai-Style Okonomiyaki:
  • One can add anything that one likes in okonomiyaki, so just choose one's favourite ingredients and it will turn out very yummy.
  • While cooking the okonomiyaki, turn heat to low to prevent the bottom of the okonomiyaki from getting burnt and also to cook the insides thoroughly.
  • Other than okonomiyaki sauce, one can also use other condiments that one likes, for example, Bit Bit likes it with ketchup, or one can use light soy sauce if one prefers a more savoury flavour.
  • Okonomiyaki is a pancake made with mainly cabbage, and is crispy outside and soft in the inside. Bit Bit likes it a lot!


Ingredients that Bit Bit used to make Kansai-Style Okonomiyaki:
  1. All Purpose Flour - About 50gm
  2. Baking Powder - 1/4 Tsp
  3. Water - About 80ml
  4. Granulated Dashi - 1/8 Tsp
  5. Salt - A Pinch
  6. Cabbage - About 150gm to 200gm
  7. Beansprouts - 1/2 Cup
  8. Cheese - 1 Slice
  9. Egg - 1 Whole
  10. Ketchup - 2 Tbsp
  11. Worcestershire Sauce - 2 Tbsp
  12. Honey - 1.5 Tbsp
  13. Spring Onion - 1 Stalk
  14. Bonito Flakes - 1 Handful
  15. Canola Oil - 1/2 Tbsp


Method that Bit Bit used to cook Kansai-Style Okonomiyaki:
  1. In a big bowl, add in flour, baking powder and salt.
  2. In a small bowl, add in water and granulated dashi, and mix well.
  3. Pour the dashi mixture into the big bowl, and mix well.
  4. Wash the cabbage, shred into small pieces and add into the flour mixture.
  5. Wash the beansprouts and add into the flour mixture.
  6. Tear the cheese slices into small pieces and add into the flour mixture.
  7. Crack an egg into the flour mixture.
  8. Mix the ingredients with the flour mixture well.
  9. Heat up a pan and grease the pan.
  10. Turn heat to low and pour in the okonomiyaki mixture, forming a round circle.
  11. Let the okonomiyaki cook for about 10 minutes, or till the bottom browns.
  12. Flip the okonomiyaki over and let the other side of the okonomiyaki cook for about 10 minutes, or till it browns.
  13. Use a spoon or spatula to press the okonomiyaki lightly, flattening it a little.
  14. Cook for about 3 to 5 minutes and flip it over.
  15. In a small bowl, mix the ketchup, honey and worcestershire sauce.
  16. Spread the sauce mixture on the top of the okonomiyaki, while still letting the okonomiyaki cook.
  17. Wash and cut the spring onion into small pieces.
  18. Sprinkle the spring onion and bonito flakes over the okonomiyaki.
  19. Cook for about 2 to 3 minutes more.
  20. Serve and eat!

Saturday 11 August 2012

Steamed Sweet Potato


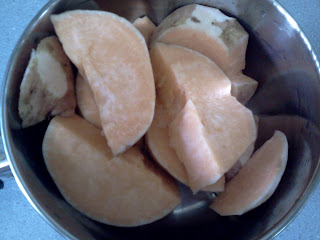
Pig made sweet potato soup the other day, and there was still a big sweet potato left in the fridge. Bit Bit was thinking of how to use the sweet potato, and thought of making sweet potato coated in sugar, however deep frying the sweet potato felt too oily and high in calories, so Bit Bit decided to steam the sweet potato.

This dish took about 35 minutes.

Things that Bit Bit found out about Steamed Sweet Potato:
  • There are many types of sweet potatoes, and the two that are commonly found in Singapore, are the yellow-fleshed sweet potato with purple skin and the orange-fleshed with brown skin. The former which Bit Bit knows as Japanese Sweet Potato is sweeter and firmer, while the latter is more mild in taste and softer. Bit Bit prefers the japanese sweet potato.
  • There are also many ways of preparing sweet potato, which includes boiling, steaming, baking and frying. Bit Bit feels that boiling or steaming the sweet potatoes are one of the healthier methods, and they taste just as yummy.
  • Sweet potato is a very healthy food filled with vitamins, but it is a carbohydrate so eat it with some protein as well.

Ingredients that Bit Bit used for Steamed Sweet Potato:
  1. Sweet Potato - 1 Big Whole

Method that Bit Bit used to make Steamed Sweet Potato:
  1. Wash the sweet potato and cut into even width sizes.
  2. Cut away the outer roots of the sweet potato.
  3. Wash the sweet potato pieces.
  4. Pour some water into a pot, sufficient for steaming.
  5. Bring the water to a boil and steam the sweet potato for about 25 to 30 minutes.
  6. Poke the sweet potato with a chopstick and if it goes through smoothly, turn off the heat and remove the sweet potato.
  7. Serve and eat!

Wednesday 8 August 2012

Happy 47th Birthday Singapore!


It is Singapore's 47th birthday on 9th August 2012! To celebrate this special day, Bit Bit made a Singapore mantou! Though the mantou didn't turn out to be as red as it should be, Bit Bit is still happy with the results. Happy Birthday Singapore!


Before steaming!


Mini SG mantous!

Plain Fried Rice Vermicelli (Plain Fried Bee Hoon) 炒米粉


One of Bit Bit's favourite breakfast is a packet of fried bee hoon with sambal chilli, especially when the bee hoon has just been cooked. Bit Bit can finish the whole packet of bee hoon within 10 minutes. Looking at the rice vermicelli (bee hoon) kept in the cupboard, Bit Bit decided to make chao mee fen (fried bee hoon).

This dish took about 25 minutes.

Things that Bit Bit found out about Plain Fried Bee Hoon:
  • Plain fried bee hoon is a very common breakfast dish in Singapore, and many people will often buy a packet and bring it to work.
  • Common toppings with the plain fried bee hoon are fried egg, hot dog, fried chicken wing, fried chicken pieces, fishcake, fried fish fillet, chicken nuggets, stir-fried vegetables and many more.
  • This dish is normally eaten with sambal chilli or pickled green chilli, which are both Bit Bit's favourites.
  • Although this dish is called plain fried bee hoon, some hawkers will add in beansprouts and/or cabbage.
Ingredients that Bit Bit used for Plain Fried Bee Hoon:
  1. Bee Hoon (Rice Vermicelli) - 2 Servings of 50gm Each
  2. Cabbage - 2 Cups
  3. Beansprouts - 2 Cups
  4. Dark Soy Sauce - 1 Tbsp
  5. Light Soy Sauce - 1 Tbsp
  6. Salt - A Pinch
  7. Canola Oil - 1 Tbsp
  8. Water - 1/2 Cup

Method that Bit Bit used to cook Plain Fried Bee Hoon:
  1. Soak the bee hoon in water for about 10 minutes, and drain.
  2. Wash the beansprouts and set aside.
  3. Wash and cut the cabbage into small pieces, and set aside.
  4. Heat up a pan and add oil.
  5. Add in the cabbage and stir fry for 5 minutes.
  6. Add in the water and simmer till cabbage softens.
  7. Add in beansprouts and bee hoon.
  8. Add in dark soy sauce, light soy sauce and salt.
  9. Stir fry and mix well, for about 5 minutes.
  10. Serve and eat!

Tuesday 7 August 2012

Japanese Cold Tofu (Hiyayakko) 冷奴

Bit Bit bought two packets of tofu from NTUC recently, as the protein in tofu is quite important for vegetarians like Pig. However, this dish will not be for Pig, as it contains spring onions and katsuobushi (bonito flakes), though Bit Bit did remove these two ingredients and letting Pig eat the tofu with soy sauce only, and it still tastes yummy.

This is a very, very, very simple dish and takes only about 8 minutes.

Things that Bit Bit found out about Hiyayakko:
  • Hiyayakko is a cold dish which is suitable to eat during hot weather.
  • This dish focuses on the taste of the fresh tofu, which is very suitable for tofu lovers. Bit Bit loves it a lot.
  • The tofu has to be served cold to enhance its flavour, so eat it fast.
  • The light soy sauce, spring onion and katsuobushi is a very wonderful combination for tofu.
  • For hiyayakko, one can use either silken tofu or firm tofu. Bit Bit used Chinese Tofu, which has a texture like silken tofu but firmer.
Ingredients that Bit Bit used for Hiyayakko:
  1. Chinese Tofu - 1/3 Block of 300gm
  2. Spring Onion - 2 Leaves
  3. Light Soy Sauce - 1 Tsp
  4. Katsuobushi (Bonito Flakes) - 1 Pinch
Method that Bit Bit used to make Hiyayakko:
  1. Remove the tofu from the box and rinse under water.
  2. Cut 1/3 of the tofu and place it in a small bowl.
  3. Drizzle the light soy sauce over the tofu.
  4. Wash and cut the spring onion into small rings, and sprinkle over the tofu.
  5. Sprinkle some bonito flakes over the tofu.
  6. Serve immediately and eat!

Sunday 5 August 2012

Simmered Bamboo Shoots (Takenoko no Nimono) たけのこの煮物


Bit Bit bought a packet of bamboo shoots from Giant recently, intending to make a Japanese dish out of it. After thinking through, simmered bamboo shoots (takenoko no nimono) seemed like an easy and delicious dish, so Bit Bit proceeded to make takenoko no nimono.

This dish took about 45 minutes, as time is needed to simmer the bamboo shoots till it has great flavour.

Things that Bit Bit found out about Takenoko no Nimono:
  • Nimono are dishes that are simmered till the stock gets absorbed by the food. One type of nimono is the takenoko no nimono.
  • Bamboo shoots are high in nutritional value, low in calories and high in protein.
  • This dish is not only healthy, and it is also very filling, which is great for those on diet.
  • For non-vegetarians, adding some bonito flakes (katsuobushi) also adds a fragrant flavour to the takenoko no nimono.


Ingredients that Bit Bit used for Takenoko no Nimono:
  1. Boiled Bamboo Shoots - 1 Packet of 250gm
  2. Dried Kelp (Kombu) - 1 Small Rectangle Piece
  3. Water - 2 Cups
  4. Mirin - 1.5 Tbsp
  5. Light Soy Sauce - 1.5 Tbsp
Method that Bit Bit used to make Takenoko no Nimono:
  1. In a pot, add the 2 cups of water and kombu. Bring to a boil and simmer for 15 minutes.
  2. Bring another pot of water to boil.
  3. Wash and cut the bamboo shoots into bite sizes.
  4. Boil the bamboo shoots for about 5 to 10 minutes and remove.
  5. When the kombu stock has simmered for 15 minutes, cut the kombu into strips.
  6. Add in mirin and light soy sauce, and bring the stock to a boil.
  7. Add in the boiled bamboo shoots and let it boil in the stock till all the stock is gone. It takes about 15 to 20 minutes.
  8. Serve and eat!

Friday 3 August 2012

Japanese Vinegar Pickled Cabbage (Kyabetsu no Suzuke) キャベツの酢漬け


Bit Bit finally went to NTUC to buy a big bottle of rice vinegar, and was thinking of making some pickled green chilli which is good to eat with noodles. But there were no cheap green chilli in the market, so Bit Bit decided to use the leftover cabbage and make kyabetsu no suzuke (vinegar pickled cabbage).

The preparation of this dish took about 20 minutes, but it will still need to be left overnight or a few hours.

Things that Bit Bit found out about Kyabetsu no Suzuke:
  • Sugar is needed as the vinegar may be too acidic to eat on its own. Water can be added to dilute the vinegar too.
  • The calories for this dish is very low, and is very delicious too.
  • Other vegetables can be used too, for example, radish, chilli, cucumber, etc.
  • Other than vinegar pickling, there is also salt pickling and Bit Bit will try it some time soon. 
  • Normally there will be a weight to push the vegetables down into the liquid.


Ingredients that Bit Bit used for Kyabetsu no Suzuke:
  1. Cabbage - 4 to 5 Cups
  2. Carrot - 1 Medium Whole
  3. Salt - 1 Tbsp
  4. Rice Vinegar - 1 Big Bottle of 600ml
  5. Water - 2 Cups
  6. Sugar - 7 Tbsp


Method that Bit Bit used to make Kyabetsu no Suzuke:
  1. Wash and shred the cabbage into tiny pieces.
  2. Wash and remove the skin of the carrot, and cut into small slices.
  3. Soak the cabbage and carrot in water and add salt, for about 30 minutes.
  4. Rinse and wash the vegetables.
  5. Use a wet towel to pat dry the vegetables and place them in a dry container.
  6. In a pot, pour the vinegar, water and sugar in, and stir well.
  7. Boil the vinegar mixture, and pour it over the vegetables.
  8. Close the lid of the container and let the vegetables soak overnight.
  9. Put the container into the fridge the next day.
  10. Serve and enjoy!

Wednesday 1 August 2012

Fried Flat Rice Noodles (Char Kway Teow) 炒粿条 - Vegetarian


Pig bought some yellow noodles and kway teow (flat rice noodles) from the market yesterday, and the first thought when Bit Bit saw the noodles, was char kway teow! It has been some time since Bit Bit last ate char kway teow (fried flat rice noodles) which were absolutely delicious but also absolutely fattening, but since it is homemade, Bit Bit shall use healthier options to lower its calories and also make it vegetarian for Pig's dinner.

The vegetarian char kway teow took about 40 minutes.

Things that Bit Bit found out about Vegetarian Char Kway Teow:
  • Adding dark soy sauce adds more colour to the dish, while adding light soy sauce adds more saltiness.
  • Adding some sweet sauce to the char kway teow will allow it to have a slight sweetness.
  • Although the dish is called char kway teow (fried flat rice noodles), adding yellow noodles to it will give it a different texture, and is very yummy.
  • Try not to over stir-fry the dish, as the kway teow (flat rice noodles) and tau kwa (firm beancurd) will break into pieces.

Ingredients that Bit Bit used for Vegetarian Char Kway Teow:
  1. Yellow Noodles - About 150gm
  2. Kway Teow (Flat Rice Noodles) - About 200gm
  3. Tau Gey (Beansprouts) - 2 Cups
  4. Tau Kwa (Firm Beancurd) - 1 Piece
  5. Chye Poh (Preserved Radish) - 2 to 3 Tbsp
  6. Cabbage - 1.5 Cups
  7. Dark Soy Sauce - 2 Tbsp
  8. Light Soy Sauce - 1.5 Tbsp
  9. Sweet Sauce - 2 Tbsp
  10. Salt - A Pinch
  11. Canola Oil - 2 Tbsp
  12. Water - 1/2 Cup


Method that Bit Bit used for Vegetarian Char Kway Teow:
  1. Wash the beansprouts and set aside.
  2. Cut the tau kwa into slices and set aside.
  3. Wash and cut the cabbage into small pieces and set aside.
  4. Heat up a pan and add oil.
  5. Wash the chye poh and add it into the pan.
  6. Fry it for about 3 to 5 minutes till it turns brownish.
  7. Add in the tau kwa and cabbage, and fry for about 5 minutes.
  8. Add water, and simmer till cabbage has softened.
  9. Add in beansprouts and both noodles into the pan.
  10. Add in dark soy sauce, light soy sauce, sweet sauce and salt.
  11. Stir fry and mix well, for about 5 minutes.
  12. Serve and eat!